Sunday, January 26, 2014

Using AWS Role Credentials, Part I

Due to available tinkering time, this process will be documented in a series of smaller blog entries...

Amazon AWS provides for a mechanism within EC2 to automatically generate API credentials tied to IAM roles.  Basically, this is just a long-winded way to say that they've implemented something to replace embedded passwords (access key, secret key or AK/SK).

The first step in this process will be to generate a simple Java-based client which connects to S3 and lists the contents of a given bucket.  This application will initially use an AwsCredentials.properties file to test locally.  In Part II, we will remove the credentials file and deploy the application to a running EC2 instance using a role with S3 access to verify success.

The initial application file is listed below:

   
 package chris;  
   
 import com.amazonaws.auth.ClasspathPropertiesFileCredentialsProvider;  
 import com.amazonaws.regions.Region;  
 import com.amazonaws.regions.Regions;  
 import com.amazonaws.services.s3.AmazonS3;  
 import com.amazonaws.services.s3.AmazonS3Client;  
 import com.amazonaws.services.s3.model.ListObjectsRequest;  
 import com.amazonaws.services.s3.model.ObjectListing;  
 import com.amazonaws.services.s3.model.S3ObjectSummary;  
   
 public class Application  
 {  
   public void listObjects(AmazonS3 s3Client, String bucketName)  
   {  
       ListObjectsRequest listObjectsRequest = new ListObjectsRequest().withBucketName(bucketName);  
       ObjectListing objectListing = s3Client.listObjects(listObjectsRequest);  
       for (S3ObjectSummary objectSummary : objectListing.getObjectSummaries())  
       {  
           System.out.println(objectSummary.getKey() + " (size: " + objectSummary.getSize() + ")");  
       }  
   }  
   
   public void run()  
   {  
       Region region = Region.getRegion(Regions.US_EAST_1);  
       String bucketName = "SPARETIMENOTEBOOK";  
       
       try  
       {  
           // USE THE FOLLOWING LOCALLY WITH AWSCREDENTIALS.PROPERTIES FILE PRESENT  
           AmazonS3Client s3Client = new AmazonS3Client(new ClasspathPropertiesFileCredentialsProvider());  
   
           // USE THE FOLLOWING ON PRODUCTION EC2 INSTANCE  
           // AmazonS3Client s3Client = new AmazonS3Client();  
   
           s3Client.setRegion(region);  
           listObjects(s3Client, bucketName);  
       }  
       catch (Exception e)  
       {  
           e.printStackTrace();  
       }  
   }  
     
   public static void main(String[] args)  
   {  
       Application app = new Application();  
       app.run();  
   }  
 }  

AwsCredentials.properties contains only the following:

    secretKey=MY_SECRET_KEY_GOES_HERE
    accessKey=MY_ACCESS_KEY_GOES_HERE

with the obvious inclusion of the actual key values...

After compilation, the class was observed running as expected and displays the contents of the given S3 bucket.  In the next part, I will create an EC2 role and deploy the application to a running instance to verify the code runs properly without the included credentials.

Thursday, January 9, 2014

Breadboard Mk. II

Although the Mark I had served me well, it turned out to be a bit large for most of my needs.  With a few more projects gearing up in 2014, I decided to exchange size for quantity, and built 3 smaller boards instead of the one larger unit.


The new foundation is a 6x9 polyethylene cutting board with two 840 point breadboards and a 60 point bus strip running across the top.  Enough room is remaining on top to add binding posts at a later date, but over time I've found that I don't frequently use them, so I'll hold off on them for now.  The Arduino Rev3 was also installed on a 6x9 board.  This works well but could be improved...

Overall, I probably could have used a prefab board, but I find the heavier 1/2 cutting board material easier to hold and less prone to scratching my desktop, so worth an evening of easy assembly.

Tuesday, December 31, 2013

Building a battery shelf

Is there a better way to finish out a year than finding an excuse to use the table saw?  Well probably, but anyway...  Today's task was to build a small shelf to hold a few rechargable tool batteries.

There is not much to detail on the process.  I used a scrap piece of 3/4 plywood, cut it to dimensions, routed/sanded the edges, and joined with 3" angle brackets.  I also tie-zipped a power strip to the shelf in order to make easy work of the wiring.  see below for photos...


Saturday, November 16, 2013

Repairing the sound on a toy truck

A recent family road trip took us to the Virginia Safari Park in Natural Bridge, VA.  The kids had a great time, and on the way out, we purchased a small toy truck.  Unfortunately, after we were home and unpackaged the toy, the sound would not work.  We ordered the world's smallest batteries on Amazon (LR41s, as who keeps those on hand);  After replacing the batteries, things were still not working properly.


After removing and disassembling the box which appeared to be the sound source, a disconnected wire was found on the piezo speaker.


A second or two from a hot soldering iron put the wire back in place, and the sound was functional again.


The last trick was re-assembling the case.  Since the iron was already hot, I just melted the plastic a bit and that seemed to do the trick.


The box was snapped back onto the truck and returned to a very happy 3-year boy.

Sunday, October 20, 2013

Creating Backups in AWS Glacier with CrossFTP

Amazon Glacier is a storage service that is priced/optimized for long-term data archival and backup.  At the current time, storage charges are $0.01 per gigabyte per month (eastern region) with a number of minor ancillary charges.  Some basic operations can be performed through the AWS Console, but most require the use of either a specialized FTP client or custom code.  I opted for the quick and easy route, and found CrossFTP after researching a few available options.  They already had a tutorial posted on their blog, and the snapshots below are just my own notes from following that process.

After installing the CrossFTP Pro software, the following steps were used to setup a new site, create a Amazon Vault, and upload a sample file (note that as soon as the file upload completes to Amazon's servers, your charge meter begins to tick).

First, a little house-keeping.  In the CrossFTP Site Manager (menu Sites | Site Manager), create an organizational folder to hold any AWS sites (not required, I just can't stand an unstructured list):


To create the site listing, you will need a two pieces of information in advance:


Press 'Close' to save the site.  It will appear in the CrossFTP site list, and connecting is just a double-click away


Amazon uses the term "Vaults" to refer to the top level directories/folders within your Glacier account, and the only apparent reason for that resides in the brains of marketing personnel; as far as I can tell, they are just directories.  I created a directory called "Backups" by using the "plus folder" icon in CrossFTP


To verify the operation worked, I logged into the Amazon console and displayed my list of Glacier vaults in the eastern region.  The new backups folder/Vault was present and accounted for


The last step involved actually putting a file online.  Note that since this is where the primary charging from Glacier originates, you'll want to ensure you upload things you actually care enough to pay for on a monthly basis.  In this case, I selected an old photo, renamed it for illustrative purposes, and uploaded it.


To disconnect from the site in CrossFTP, press the "planetary X" button above.

Next on my radar is to spend some time determining the best file format to use for storage on Glacier.  Since charging occurs by the byte, clearly a compressed format would be desirable, and for the sake of security, some kind of encryption would also be in order.  However, introducing compression and encryption means that the loss of even 1 bit of data could be catastrophic.  Per documentation, Amazon claims an average annual durability of 99.999999999% and performs at-rest encryption using AES-256.  However, for those of us who are truly paranoid, a few more steps are probably in order.  More investigation is needed, but parity archive files via Parchive may be part of the answer.

Saturday, October 19, 2013

Upgrading to Windows 8.1

According to the pressers, Windows 8.1 would contain the feature to allow you to boot directly to the desktop (bypassing the tiles screen), which for me, made it worth the cost of admission (its a free upgrade, but lets not discount the value of personal time).  For the time being lets put aside the discussion that the most important feature of the 8.1 release was the inclusion of functionality to bypass the core selling point for the 8.0 release...

I took the option of using the Windows store to install the upgrade, and by and large it went on clean and without any technical hiccups.  There was, however, one absolutely infuriating feature which required linking my existing local account to a "Microsoft account" (ie - hotmail) as part of the install.  Requiring information such as that is fine for free sites/apps, but we were counting on Microsoft to be the "software equivalent of the adult in the room", and just allow us to use our paid software in the manner of our choosing.  Even the much advertised "Start menu" button return is a bit of a kludge (it looks like they spent five minutes building the attached menu UI).  Heading down this path proves again that the cleansing at Redmond is still not complete, and more purging of upper management is required to get this company back on track - they clearly haven't learned the appropriate lessons from the 8.0 fiasco.

In any event, I took the following steps to return my new 8.1 PC "back to normal" and find that without the requirement to boot to the tiles screen, I can now almost pretend that the monstrosity does not exist.

  • Disconnecting my local account after the completion of the install
    • Control Panel | User Accounts | Make changes to my account in PC settings
      • While on the configuration screen, press the DISCONNECT button

  • Remove the atrocious new lock screen image
    • Again, not sure what they are thinking here, but the new image is horrid.  Back to the 8.0 image...
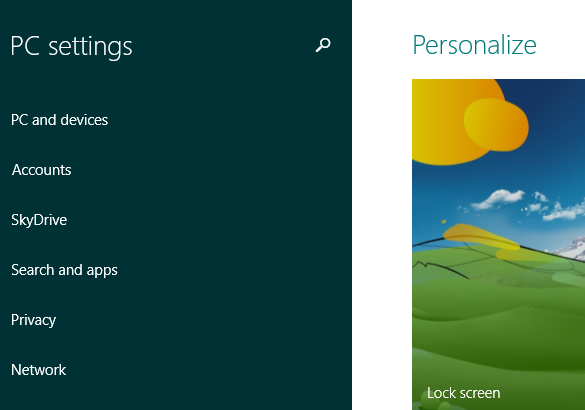
    • Charm Menu | Settings | Change PC Settings | Lock Screen


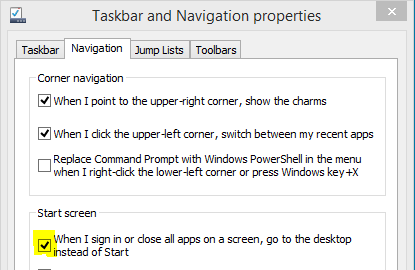
  • Boot directly to the desktop
    • On the desktop, right click the task bar and choose Properties
    • On the navigation tab, select "When I sign in..."


  • Upgrade VMWare Player
    • After the 8.1 upgrade, Player 5.0.1 could no longer connect to the network from Virtual Machines
    • VMWare | Player | Help |  Software Updates
      • As luck would have it, a reboot was not even required for this upgrade. All appears well in Player 6.

After almost a year under my belt in Windows 8 (including betas and such), and honestly really trying to like it and find a way to live with it, I find myself looking forward and hoping that Windows 9 will return to the ways of Windows 7, and back to a fully functional desktop operating system.  This foray into trendy tablet UI features on a desktop has proven a miserable failure, and I find myself ready for the experiment to end.

Tuesday, October 1, 2013

Netgear WN3000RP Disassembly

After a few years in use, it was time to retire the wireless extender for my network and upgrade to the latest model.  Before decommissioning the device, I disassembled it looking for spare/useful parts.  The case was held together with four torx screws on the exterior, and four more philips head screws holding the PCB onto the case standoffs.


The major chips on the unit are as follows:
The most useful piece turned out to be the power supply and case.  With the size of the unit and convenient location of the standoffs, this remnant will live on in my spare parts bin and may someday be reborn as a new custom device housing for a home-made PCB.