Saturday, October 19, 2013

Upgrading to Windows 8.1

According to the pressers, Windows 8.1 would contain the feature to allow you to boot directly to the desktop (bypassing the tiles screen), which for me, made it worth the cost of admission (its a free upgrade, but lets not discount the value of personal time).  For the time being lets put aside the discussion that the most important feature of the 8.1 release was the inclusion of functionality to bypass the core selling point for the 8.0 release...

I took the option of using the Windows store to install the upgrade, and by and large it went on clean and without any technical hiccups.  There was, however, one absolutely infuriating feature which required linking my existing local account to a "Microsoft account" (ie - hotmail) as part of the install.  Requiring information such as that is fine for free sites/apps, but we were counting on Microsoft to be the "software equivalent of the adult in the room", and just allow us to use our paid software in the manner of our choosing.  Even the much advertised "Start menu" button return is a bit of a kludge (it looks like they spent five minutes building the attached menu UI).  Heading down this path proves again that the cleansing at Redmond is still not complete, and more purging of upper management is required to get this company back on track - they clearly haven't learned the appropriate lessons from the 8.0 fiasco.

In any event, I took the following steps to return my new 8.1 PC "back to normal" and find that without the requirement to boot to the tiles screen, I can now almost pretend that the monstrosity does not exist.

  • Disconnecting my local account after the completion of the install
    • Control Panel | User Accounts | Make changes to my account in PC settings
      • While on the configuration screen, press the DISCONNECT button

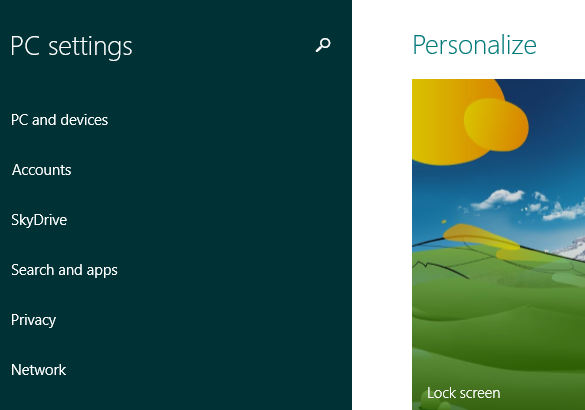
  • Remove the atrocious new lock screen image
    • Again, not sure what they are thinking here, but the new image is horrid.  Back to the 8.0 image...
    • Charm Menu | Settings | Change PC Settings | Lock Screen

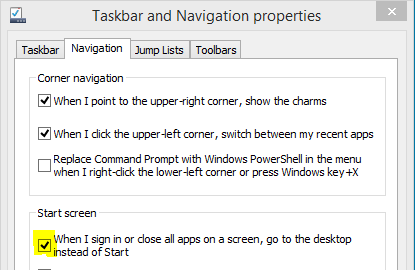
  • Boot directly to the desktop
    • On the desktop, right click the task bar and choose Properties
    • On the navigation tab, select "When I sign in..."

  • Upgrade VMWare Player
    • After the 8.1 upgrade, Player 5.0.1 could no longer connect to the network from Virtual Machines
    • VMWare | Player | Help |  Software Updates
      • As luck would have it, a reboot was not even required for this upgrade. All appears well in Player 6.

After almost a year under my belt in Windows 8 (including betas and such), and honestly really trying to like it and find a way to live with it, I find myself looking forward and hoping that Windows 9 will return to the ways of Windows 7, and back to a fully functional desktop operating system.  This foray into trendy tablet UI features on a desktop has proven a miserable failure, and I find myself ready for the experiment to end.

Tuesday, October 1, 2013

Netgear WN3000RP Disassembly

After a few years in use, it was time to retire the wireless extender for my network and upgrade to the latest model.  Before decommissioning the device, I disassembled it looking for spare/useful parts.  The case was held together with four torx screws on the exterior, and four more philips head screws holding the PCB onto the case standoffs.


The major chips on the unit are as follows:
The most useful piece turned out to be the power supply and case.  With the size of the unit and convenient location of the standoffs, this remnant will live on in my spare parts bin and may someday be reborn as a new custom device housing for a home-made PCB.

Sunday, September 22, 2013

Amazon AWS Useful Links

The following are useful links while working with Amazon AWS services (not in any particular order):
  • http://awsnow.info
    • A summary of Amazon Services, Costs, Limitations
  • http://cloudping.info
    • Used to estimate the latency from your browser to each AWS region
  • Amazon AWS direct links
    • http://aws.amazon.com/architecture/
    • http://aws.amazon.com/whitepapers/
    • http://aws.amazon.com/solutions/case-studies/
    • http://aws.amazon.com/training/self-paced-labs/
    • https://aws.amazon.com/marketplace
    • http://aws.amazon.com/cloudformation/aws-cloudformation-templates/
    • Amazon AWS Calculator  (google: aws simple monthly calculator)
      • http://calculator.s3.amazonaws.com/calc5.html
  • Presentation: AWS Regions and Availability Zones
    • http://bit.ly/aws-arch-prezi
  • Miscellaneous Google searches
    • spot instance strategies
      • https://www.youtube.com/watch?v=WD9N73F3Fao
    • cloud formation templates
    • aws case studies
  • Netflix Ice Project
    • Ice communicates with AWS Programmatic Billing Access and maintains knowledge of the following key AWS entity categories: Accounts, Regions, Services (e.g. EC2, S3, EBS), Usage types (e.g. EC2 - m1.xlarge), Cost and Usage Categories.
    •  https://github.com/Netflix/ice

Sunday, September 8, 2013

Symmetric key encryption in Java using AES

Per Wikipedia, symmetric key encryption is defined as:  Symmetric-key algorithms are a class of algorithms for cryptography that use the same cryptographic keys for both encryption of plaintext and decryption of ciphertext.

As with most things, everything you need to know about AES in Java can be found on Google, but scattered across a number of partial code snippets.  Below is a my attempt to consolidate that information into a single example application (JDK7) which takes a sentence and runs it back and forth through the encryption process.  In reality, you would be best served by not using "password" as a password, avoiding sequential byte sequences as your keys and/or initialization vectors, and removing passwords from your code. :)

   
 package chris;  
   
 import java.io.FileInputStream;  
 import java.security.Key;  
 import java.security.KeyStore;  
 import javax.crypto.Cipher;  
 import javax.crypto.spec.IvParameterSpec;  
 import javax.crypto.spec.SecretKeySpec;  
   
 /**  
  * JAVA AES EXAMPLE APPLICATION  
  *   
  * java cipher documentation:  
  * http://docs.oracle.com/javase/7/docs/technotes/guides/security/SunProviders.html#SunJSSEProvider  
  * http://docs.oracle.com/javase/7/docs/technotes/guides/security/StandardNames.html#impl  
  *   
  * @author Chris  
  */  
 public class Application  
 {  
      public void aes(boolean useHardcodedKey) throws Exception  
      {  
           System.out.println("---- AES EXAMPLE ----");  
   
           System.out.println("original string: " + CLEARTEXT);  
           System.out.println("original length: " + CLEARTEXT.length());  
   
           // SELECT ALGORITHM  
             
           String algorithm = "AES/CBC/PKCS5Padding";  
                        // or "AES/CBC/ISO10126PADDING";  
             
           SecretKeySpec secretKey = null;  
             
           if(useHardcodedKey)  
           {  
                secretKey = new SecretKeySpec(RAW_KEY, "AES");  
           }  
           else  
           {  
                FileInputStream in = new FileInputStream(AES_KEYSTORE);  
                KeyStore keystore = KeyStore.getInstance("JCEKS");  
                keystore.load(in, PASSWORD);  
                Key key = keystore.getKey("mykey", PASSWORD);  
                secretKey = new SecretKeySpec(key.getEncoded(), "AES");  
           }  
             
           // INITIALIZATION VECTOR  
          
           byte[] ivBytes = new byte[]  
                     {0x00, 0x01, 0x02, 0x03,0x04, 0x05, 0x06, 0x07,   
                      0x08, 0x09, 0x0A, 0x0B, 0x0C, 0x0D, 0x0E, 0x0F};  
          
           IvParameterSpec ivSpec = new IvParameterSpec(ivBytes);  
   
           // ENCRYPT  
          
           Cipher cipherENCRYPT = Cipher.getInstance(algorithm);  
           cipherENCRYPT.init(Cipher.ENCRYPT_MODE, secretKey, ivSpec);  
           byte[] crypted = cipherENCRYPT.doFinal(CLEARTEXT.getBytes());  
   
           // DECRYPT  
          
           Cipher cipherDECRYPT = Cipher.getInstance(algorithm);  
           cipherDECRYPT.init(Cipher.DECRYPT_MODE, secretKey, ivSpec);  
           byte[] decrypted = cipherDECRYPT.doFinal(crypted);  
          
           // VERIFY  
          
           String compare = new String(decrypted, "UTF8");  
           System.out.println("decrypted string: " + compare);  
           System.out.println("decrypted length: " + compare.length());  
      }  
        
      public static void main(String[] args)  
      {  
           Application app = new Application();  
             
           try  
           {  
                app.aes(true);  
           }  
           catch(Exception e)  
           {  
                e.printStackTrace();  
           }  
      }  
        
      private static final String CLEARTEXT = "Here is a proprietary sentence to protect.";  
        
      // HARD-CODED AES SECRET KEY  
        
      private static final byte[] RAW_KEY = new byte[]  
                {0x00, 0x01, 0x02, 0x03, 0x04, 0x05, 0x06, 0x07,  
                 0x08, 0x09, 0x0A, 0x0B, 0x0C, 0x0D, 0x0E, 0x0F};  
   
      // KEYTOOL commands for generating an AES keystore  
      //  
      // keytool -genseckey -alias mykey -keyalg AES -keysize 128   
      //     -storepass password -storetype JCEKS -keystore aes.jks  
      // keytool -list -v -keystore keystore.jks -storetype JCEKS  
   
      private static final String AES_KEYSTORE = "c:\\temp\\aes.jks";  
      private static final char[] PASSWORD = "password".toCharArray();  
 }  
   

Thanks to codeformatter for providing the easy-to-use code formatting tool for use with blogger.

Friday, August 23, 2013

Building an alternate nozzle for a Karcher K5.540 Power Washer

It seems like a rather odd thing to do, but in order to support a recent project, I needed to find a way to replace the gianourmous spray gun attachment which ships with the Karcher K5.540 with something a bit smaller.  The resulting sprayer nozzle looks like this when assembled:


The Karcher units are a little tricky as they use a proprietary fitting on their hoses.  Luckily, RJ Bowers carries a part (black piece above) which connects the high pressure hose via a quick connecter and terminates in a common M22 thread.

The four magic pieces used to assemble the sprayer gun replacement are as follows:
  • RJ Bowers: Karcher 4.470-041.0 (4470-0410)
  • General Pump M22 Male to 1/4" NPT Male Adapter (D10021)
  • Brass Sleeve-Lock Socket, 1/4" NPTF Female, 1/4" Coupling (6537K73)
  • Briggs & Stratton 6193 Quick Connect Spray Tips (6193)
The B&S quick connect spray tips come with a variety of angles:
  • Black - low pressure tip
  • White - 40 degree
  • Green - 25 degree
  • Yellow - 15 degree (seen in the above picture)
  • Red - 0 degree
The red tip is fairly useless unless you are planning to write your name in concrete.  The next most powerful is the yellow tip at 15 degrees.  The resulting spray is not quite as intense as from the original spray head (perhaps the nozzle output hole is too large), but is still respectable and has a much smaller profile.  In short, its perfect for the prototype system I'm working on.

I initially had some concerns about back pressure from the new head, but based on the results, I do not think it will be a problem.

Sunday, July 28, 2013

Enabling Amazon AWS Billing Alerts

To eliminate billing surprises at the end of the month, an Amazon account can enable billing alerts which will monitor usage and send notifications when threshold limits are exceeded.  This is done through the "Account Activity" page for the user.

Log into the AWS Console, navigate to the Account Activity page, and click "Enable Now".


The site will take a minute to process your request, and then alert you when the task is completed.


After alerts are enabled, on the same Account Activity page there will be a link to "Set your first billing alarm".


After clicking the link, a dialog will pop up; Press "Create Alarm" from here.


Fill out the form below; specifically, enter the email addresses where notification should be sent, as well as the US dollar amount which is your threshold.


After clicking "Create Alarm" on the dialog box, the alarm is created and enabled.


Disassembly of a Karcher 3.379 Power Washer

This weekend's fun consisted of breaking down an old electric power washer;  I have need of the high pressure water pump for a new project.


The breakdown went much quicker than anticipated.  The soap feed bottle just pops out, and the handle came off after removing two slotted screws at the base.


After the handle was off, the black accessory case on the back slid off (towards handle) with a few taps from a rubber mallet.


Then a T-15 screwdriver was used to remove about a half-dozen screws holding the two sides of the outer shell together.


With the case off, the water pump lifted out easily (nothing holding it in place except for the plastic casing being snug all around).


With the pump out, there was an elbow held in place with a "shim key" which was used to get the outfeed connector outside of the yellow plastic case.


Finally the hand wand attachment was disassembled in order to see how the outfeed water supply works.  As it turns out, just a few plastic moldings and springs holds the entire works together.


I'm not entirely sure what I was expecting when I started the disassembly, but I'm fairly sure I was expecting something a little more complex than a water pump held together with about $5 worth of injection molded plastic.  In any event, I now have a much better understanding of power washers, and even have a salvageable high-pressure water pump to be re-used in another project.