It has been three years since my last Quicken update, and due to the upgrade blackmail that Intuit has in place (stopping support for online transactions after three years), I again found myself in the position of needing to upgrade. The deluxe version of any given year always seems to provide everything I need in a "home accounting package", and the $30 is not overly burdensome on the home budget; Its really just the principal of the whole forced upgrade that rubs me wrong. I really should spend the time and migrate to an online solution, but now that Intuit owns Mint.com as well, I'm really not sure its worth the hassle and extra risk of keeping everything online.
Like most purchases these days, I purchased the product through Amazon.com, and this time there was even an option to download the binaries directly from amazon (ie - no DVD to collect dust on my desktop). The opinions on amazon for this 2013 upgrade have been fairly abysmal; lots of problems, bugs, etc. Generally speaking the product has not changed significantly this century, so it always surprises me how many bugs they can introduce in any given release; perhaps they need to upgrade the college interns they have working on their baseline.
As luck would have it, I waited until the very end of my Quicken 2010 lifespan before upgrading, which seems to have been prudent again; the amazon download started me out on release 10 (r10) of Quicken 2013, and within a few days, there has already been an r11. Again, on a product that has basically been a static release for 20+ years, I'm not sure how they manage to create so many darn bugs.
My upgrade seems to have gone smoother than most (and that I attribute to starting on the 10th revision of their software). There was one annoyance I encountered: after upgrading, when I performed "One Step Update" to sync my accounts, I saw two accounts in the list have been gone and disabled for years that had magically come back to life.
After a bit of digging, I found the workaround on the Quicken support site:
How to Remove a Bank Name from One Step Update Settings
Walking through these steps successfully removed my old accounts, but I'm still a bit miffed over the fact that the upgrade re-introduced old accounts into my update settings...
Saturday, March 2, 2013

Sunday, February 10, 2013
Interrupting a Thread in Java 7
In order to construct a well-behaved server class in Java, a few key pieces are required. While researching this topic, I've discovered that there are n developers in the world working with Java concurrency and there are at least (n+1) opinions on the "proper way" to do this. I've leveraged what seems to be the most common implementation guidelines and came up with the following example.
A few general notes:
CONSOLE OUTPUT:
Jumping first to the summary, here is the program execution. You can see the server start, launch the worker thread, let it run for a short time, then signal the worker to stop. All appears in order and working well.

APPLICATION CLASS:
Nothing too exciting to discuss here... The main driver class to launch the example.

WORKER CLASS:
Here is the worker, a subclass of Thread. This could be done by implementing a Runnable instead, but I find the Thread extension cleaner to read - mileage may vary based on personal preferences. The worker does not perform any real work, but just dumps the message "worker thread performs work" to the console, then suspends.

SERVER CLASS:
Here is the implementation of the server (in order to keep the snapshot a bit cleaner, the shutdown method was extracted). There are basic methods for startup and shutdown, as well as a simulate method which simulates work by for waiting for a short time.

SERVER SHUTDOWN METHOD:
This is the key to the whole process of stopping. When the server shuts down, the worker thread needs to be asked to stop as well. The server then waits for the worker to stop and then continues on with its own cleanup. This method is really where implementations will tend to differ, based on what the worker thread is doing as well as the nature of the server itself. You can use workerThread.join() to wait forever, but if the worker thread is hung, your server will never return. This is one of those instances where you'll just need to apply best engineering judgement based on specifics to your application.

While researching Java concurrency, I did not find many full examples online; most tended to be snippets with too little, or full open source applications with too much. I hope this example application finds a balance of both and is of use to someone else.
A few general notes:
- there is much of anything in this example that is Java 7 specific, it just happens to be the version I'm using.
- since this site is hosted on blogger, and there are not too many good/convenient options for presenting source code, I've just posted screen snapshots of the code. My apologies for the laziness...
CONSOLE OUTPUT:
Jumping first to the summary, here is the program execution. You can see the server start, launch the worker thread, let it run for a short time, then signal the worker to stop. All appears in order and working well.

APPLICATION CLASS:
Nothing too exciting to discuss here... The main driver class to launch the example.

WORKER CLASS:
Here is the worker, a subclass of Thread. This could be done by implementing a Runnable instead, but I find the Thread extension cleaner to read - mileage may vary based on personal preferences. The worker does not perform any real work, but just dumps the message "worker thread performs work" to the console, then suspends.

SERVER CLASS:
Here is the implementation of the server (in order to keep the snapshot a bit cleaner, the shutdown method was extracted). There are basic methods for startup and shutdown, as well as a simulate method which simulates work by for waiting for a short time.

SERVER SHUTDOWN METHOD:
This is the key to the whole process of stopping. When the server shuts down, the worker thread needs to be asked to stop as well. The server then waits for the worker to stop and then continues on with its own cleanup. This method is really where implementations will tend to differ, based on what the worker thread is doing as well as the nature of the server itself. You can use workerThread.join() to wait forever, but if the worker thread is hung, your server will never return. This is one of those instances where you'll just need to apply best engineering judgement based on specifics to your application.

While researching Java concurrency, I did not find many full examples online; most tended to be snippets with too little, or full open source applications with too much. I hope this example application finds a balance of both and is of use to someone else.
Saturday, February 2, 2013
Updating UEFI BIOS Settings
Whenever Asus offers a motherboard BIOS update for my workstation, I usually need to rediscover the following settings which I inevitably forget to reset. One of these makes VMWare upset, causing it to throw warnings that lead to the following knowledge base note.
Note to self for the future:
Motherboard: Asus P8Z77-V Deluxe
Processor: Intel Core i7-3770K @ 3.50GHz
To update the BIOS, press F2 while rebooting to get into setup, and then switch to the advanced configuration mode screen. Modify the following settings:
Note to self for the future:
Motherboard: Asus P8Z77-V Deluxe
Processor: Intel Core i7-3770K @ 3.50GHz
To update the BIOS, press F2 while rebooting to get into setup, and then switch to the advanced configuration mode screen. Modify the following settings:
- Advanced | CPU Configuration | Intel Virtualization Technology [ENABLED]
- Monitor | CPU Fan Speed Low Limit [300RPM]
Saturday, January 12, 2013
Getting Started with the Arduino Uno R3 and Windows 8
Continuing on with my Windows 8 growing pains, I encountered issues just attempting to install the driver for the Arduino R3 board. After following the basic steps which worked fine in Win7, you are greeted with: Arduino UNO R3, The third-party INF does not contain digital signature information.

After a little online dumpster diving, I found the solution on the Arduino forums in a post from Louis Davis in March 2012 (appears to be during the Win8 beta based on the date). The key to the solution is to disable the Win8 default requirement for all drivers to be digitally signed. The steps are basically the same today, although Microsoft rearranged the menus a bit since that time. The following are the steps I followed to get the drivers installed:
select Advanced options
select Startup Settings
press the Restart button
The system will now reboot with the driver digital signature options disabled.
From this point, you can proceed with the normal Arduino install procedures. Note that under Win8, the initial device appears under "Other devices", not under "COM & LPT" as seen below.

Right click the Unknown Device and choose update drivers, then select the driver directory (and disable the feature to include subfolders):

With driver enforcement now disabled in Win8, you will be given the following option:
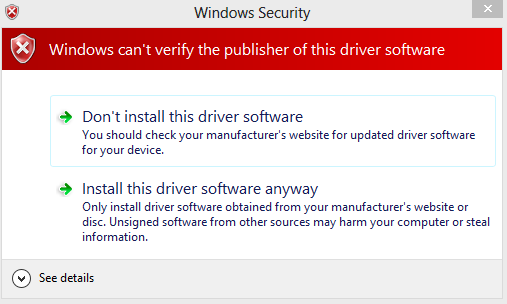
And after selecting "Install this driver software anyway", the installation will complete as expected:


After a little online dumpster diving, I found the solution on the Arduino forums in a post from Louis Davis in March 2012 (appears to be during the Win8 beta based on the date). The key to the solution is to disable the Win8 default requirement for all drivers to be digitally signed. The steps are basically the same today, although Microsoft rearranged the menus a bit since that time. The following are the steps I followed to get the drivers installed:
- From the Win8 desktop, run (Windows Key + R) the following command:
- Windows will restart to a options screen, navigate as follows:
select Advanced options
select Startup Settings
press the Restart button
- The system will reboot to a Startup Settings menu
The system will now reboot with the driver digital signature options disabled.
From this point, you can proceed with the normal Arduino install procedures. Note that under Win8, the initial device appears under "Other devices", not under "COM & LPT" as seen below.
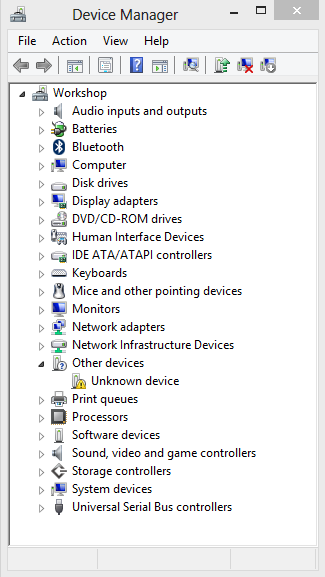
Right click the Unknown Device and choose update drivers, then select the driver directory (and disable the feature to include subfolders):

With driver enforcement now disabled in Win8, you will be given the following option:

And after selecting "Install this driver software anyway", the installation will complete as expected:


Thursday, January 10, 2013
Building a new workshop PC
The old dinosaur of a pc in my workshop was long overdue for retirement. Rather than taking the easy way out and buying a quick turnaround Dell, I decided it was far too long since I had built a rig from scratch on my own. I sourced all the materials from Amazon and thanks to prime shipping, had all the needed parts in two days.
I decided to go large on the case, and selected a Thermaltake Level 10 GT. This case has an absolutely enormous interior, plenty of cutouts for wiring, 3 large fans, and a hot-swappable drive rack.


To power the beast, I selected the Corsair Professional Series AX850, an ASUS P8Z77-V Deluxe, an Intel Core i7-3770K Quad-Core Processor, and 32GB of Corsair Vengeance RAM.


To keep the CPU cool, I went with an after market fan, the Cooler Master Hyper 212 EVO. Compared to the little thing that Intel ships with the processor, the 212 EVO is enormous. There is not an awful lot I remember from my undergrad heat transfer class, but I do remember that surface area counts, and in that category, there is absolutely no comparison between the fans.

Since the components above depleted most of my available budget, I decide to forgo a solid state drive for the time being, and stuck with a good old fashioned drive, the Seagate Barracuda 7200 3 TB. The thing is a bit noisy on startup, but overall seems to be performing well and for $45/TB, its hard to argue with a bit of noise.
Everything installed without too much hassle, and thanks to all the wiring cutouts, the finished product is clean (I really need to learn to take final pictures AFTER the cable ties are added) and should be fairly easy to maintain.

And finally, as a totally aesthetic feature, the case has a number of exterior cutouts and LEDs which are a big hit with the "little engineers" running around the house.

So far all of the parts are behaving well, and I would recommend any one of them.
I decided to go large on the case, and selected a Thermaltake Level 10 GT. This case has an absolutely enormous interior, plenty of cutouts for wiring, 3 large fans, and a hot-swappable drive rack.


To power the beast, I selected the Corsair Professional Series AX850, an ASUS P8Z77-V Deluxe, an Intel Core i7-3770K Quad-Core Processor, and 32GB of Corsair Vengeance RAM.


To keep the CPU cool, I went with an after market fan, the Cooler Master Hyper 212 EVO. Compared to the little thing that Intel ships with the processor, the 212 EVO is enormous. There is not an awful lot I remember from my undergrad heat transfer class, but I do remember that surface area counts, and in that category, there is absolutely no comparison between the fans.

Since the components above depleted most of my available budget, I decide to forgo a solid state drive for the time being, and stuck with a good old fashioned drive, the Seagate Barracuda 7200 3 TB. The thing is a bit noisy on startup, but overall seems to be performing well and for $45/TB, its hard to argue with a bit of noise.
Everything installed without too much hassle, and thanks to all the wiring cutouts, the finished product is clean (I really need to learn to take final pictures AFTER the cable ties are added) and should be fairly easy to maintain.

And finally, as a totally aesthetic feature, the case has a number of exterior cutouts and LEDs which are a big hit with the "little engineers" running around the house.

So far all of the parts are behaving well, and I would recommend any one of them.
Monday, December 31, 2012
Making the Intuos4 work with Windows 8 and Adobe Photoshop CS5
The pain of early Windows 8 adoption continued with the realization that my Wacom Intuos4 tablet no longer appeared to be functioning properly from within Adobe Photoshop CS5. Specifically, the pressure sensitive features on the brush no longer seemed to have an effect, and there was this annoying little "radar blip" that would form every time the pen would touch the surface of the Intuos.
A little online digging revealed this is a known issue, and apparently has something to do with the new pen tablet functionality integrated into the Win8 OS. While Wacom works on a proper driver patch, implementing the steps below (pulled from here and here) followed by a reboot seemed to do the trick. Note that these involve a few registry hacks, so the usual disclaimers apply about bricking your box if you step on a landmine while in the registry...
"TurnOffPenFeedback"=dword:00000000
[HKEY_LOCAL_MACHINE\Software\Policies\Microsoft\TabletPC]
"TurnOffPenFeedback"=dword:00000000
Cursors- Turn off pen feedback set to "Enable"
Hardware buttons - Prevent Press and Hold set to "Enable"
to the longest possible setting (all the way right) and the duration to shortest setting (all the way left). Do not the disable press and hold setting, as you will get lag dragging and scrolling.
Modify the key ContactVisualisation from 1 to 0
Modify the key GestureVisualisation from 1F (31) to 0
After applying the steps above, the tablet now appears to be behaving properly...
A little online digging revealed this is a known issue, and apparently has something to do with the new pen tablet functionality integrated into the Win8 OS. While Wacom works on a proper driver patch, implementing the steps below (pulled from here and here) followed by a reboot seemed to do the trick. Note that these involve a few registry hacks, so the usual disclaimers apply about bricking your box if you step on a landmine while in the registry...
- Create the following keys using regedit.exe
"TurnOffPenFeedback"=dword:00000000
[HKEY_LOCAL_MACHINE\Software\Policies\Microsoft\TabletPC]
"TurnOffPenFeedback"=dword:00000000
- Modify group policy (GPEdit.msc) to disable dynamic pen options
Cursors- Turn off pen feedback set to "Enable"
Hardware buttons - Prevent Press and Hold set to "Enable"
- Modify the Control Panel | Pen and Touch settings
to the longest possible setting (all the way right) and the duration to shortest setting (all the way left). Do not the disable press and hold setting, as you will get lag dragging and scrolling.
- Modify the Control Panel | Wacom Tablet Properties settings
- Modify the following keys using regedit.exe
Modify the key ContactVisualisation from 1 to 0
Modify the key GestureVisualisation from 1F (31) to 0
After applying the steps above, the tablet now appears to be behaving properly...
Thursday, December 27, 2012
Building a new workbench
The old workbench in my shop has served me well over the years, but ultimately was not what I needed to meet the needs of my upcoming 2013 project list. A quick trip to Home Depot and I had all the parts I needed for a replacement.

At the moment, the desktop surface is just sitting on the legs; I'll need to make another quick run to depot to get a few small 90 degree brackets to permanently attach it.
- 1 - 4x8 sheet of red oak plywood
- 5 - 2x4s

At the moment, the desktop surface is just sitting on the legs; I'll need to make another quick run to depot to get a few small 90 degree brackets to permanently attach it.
Subscribe to:
Posts (Atom)