Friday, May 3, 2013

Creating an Environment Script for EC2 tools

With a basic understanding of Amazon EC2 under my belt, I continued with my workstation build-out by creating an environment script for the EC2 command line tools.  Nothing to Earth shattering here; the majority of time involved was mostly just researching variables that needed to be set.

@echo off
set EC2_HOME=C:\Users\chris\Dev\apps\ec2-api-tools-1-6-7-2
set EC2_PRIVATE_KEY=C:\Users\chris\Dev\bin\identity\pk-xxxx.pem
set EC2_CERT=C:\Users\chris\Dev\bin\identity\cert-xxxx.pem
REM default to avoid using --region parameter everywhere from command line
set EC2_URL=https://ec2.us-east-1.amazonaws.com
set PATH=.\;%EC2_HOME%\bin;%PATH%
echo ** ENVIRONMENT SET FOR AMAZON EC2 1.6.7.2

Java settings are not required because I have those covered in another script.  The script was entered, saved in my local dev\bin directory, and worked without issue.

Thursday, May 2, 2013

Launching Amazon EC2 Instances

Before continuing with development, I tested out my new Amazon AWS account by launching both a Linux and Windows micro instance.  From start to finish, each took about 10-15 minutes (including the launch wizard, waiting for the instance to spin up, logging in, and finally termination).  Amazon has instructions posted online, but the wizard is fairly idiot-proof.  The only thought process involved is in connecting to the instance, and even that has been made fairly simple.

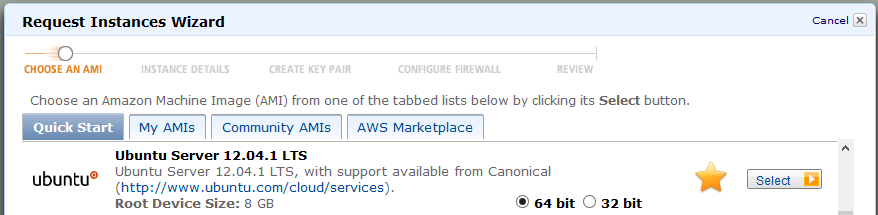
The Linux micro instance was the first to get launched.  Starting from the Amazon console, I switched into the EC2 dashboard.  It wasn't until I was over half way through the process that I realized I was defaulting to the US West (Oregon) region; I'll need to make note of that for the future (the instance responsiveness was fine even though I'm sitting on the opposite coast).  The Amazon provided documentation was adequate to get up and running.  I stepped through the New Instance wizard, and selected an Ubuntu distribution:


I accepted the defaults, with the following exceptions:


For this one I did keep the defaults, however, making a note to visit the URL above to figure out what this instance tagging is used/good for.


For the firewall configuration, I created a new rule to allow SSH only (this canned group should be ready for re-use next time).

After completing the wizard, the new Linux server started up in about 5-10 minutes:


I right-clicked the instance and attempted the Connect option.  This worked as well as could be expected for a terminal window run through a browser.  It was functional, but just no substitute for PUTTY.  The only catch to connecting through PUTTY is to remember to populate your security keys (which I had previously converted to *.ppk format) within SSH | Auth.  Once PUTTY connected, I used the username "ubuntu" and logged in without issue (or password, keys are clearly working).

Finally I exited the PUTTY session and terminated the instance.  From the same right-click menu in EC2:


choose terminate and wait until the console reflects the destruction of the instance.  I'm not entirely sure of the full scope of differences between terminate and stop, although did find this documentation that I'll need to go through at a later date.

The Windows 2008R2 micro instance performed just as smoothly.  The official amazon documentation was again comprehensive for a beginner, and the only significant difference in the startup wizard (vice Linux) was specifying 3389/RDP as the firewall configuration setting.

Logging in was indeed different, using Remote Desktop vice PUTTY.  The process begins with right-clicking the instance and retrieving the password:


and then decrypting the password with the *.pem key pair.  With an administrator username and password now in hand, I logged in using the standard Remote Desktop Connection tool which ships with Windows 8.  I completed this test by terminating the Windows instance.

I did not perform a shutdown from within Windows before terminating (because as I understand it, terminating effectively destroys the instance, so who cares if it shuts down cleanly), but will need to revisit that in the future as instances are created that I care about.

As a final step, I used the Amazon console and jumped to the Account Activity report, just to verify that all the compute time was included in the free trial (and I didn't launch the wrong instances).


Overall, things could not have been easier.  Now all I need to do is come up with a sample application to build and deploy, just to exercise the environment a little more thoroughly.

Tuesday, April 30, 2013

Creating Amazon AWS Security Credentials

Before continuing with a development environment setup, a set of security credentials were first created using the Amazon AWS Console.  From the user menu in the toolbar, select the Security Credentials option.


There are options for generating various types of identity credentials:


Not really knowing what I will need first (and ignoring the basic security tenet of only generating what you need when you need it), I generated credentials in all three categories, and saved them off to a safe place.  Finally, I used the PUTTYGEN tool to convert the Key Pair into something that will work with the PUTTY suite of tools.  Its a fairly simple matter to import the *.pem file you created and convert it to a PUTTY-friendly *.ppk file (also saved off to a safe place).


Now equipped with an account and a plethora of security credentials, I think I have the bare minimum requirements in place for moving forward.

Monday, April 29, 2013

Creating a new Amazon AWS Account

Continuing along with my journey into the cloud, I spent 10 minutes creating a new Amazon AWS account.  I started with a link for Try Cloud Computing Free and pressed the easy button:


If you've ever created an account, well anywhere, this process should be fairly old hat.  Even though you are signing up for a free trial account, you do need to provide a credit card (in case you go over the free limits).  There was one additional step which was unusual: confirming your phone number.  Amazon generates a one-time PIN and calls your number from an automated system to verify you - after punching in the PIN, you continue on your merry way:


A few minutes later I received the "all done" email:


and my account setup was complete.  A quick trip to Amazon AWS and I logged in to the account console without issue:


Now that I have an account and EC2 tools installed locally, my next steps will be getting a local build environment up and running.  To be continued...

Sunday, April 28, 2013

Downloading the Amazon EC2 Tools

We at Spare Time Notebook have been sleeping on this cloud thing for far too long; not ignoring it per se, just, well, not really needing it.  With the cost of hardware dropping through the floor as of late, its hard to let go of old habits (just buy another box) and embrace the new world.

Those lazy habits end today, as I delve into Amazon's EC2 offering.  I'll be documenting my progress/lessons learned as I go, and since time is tight, will be posting my education in pieces.

Today's effort is about as basic as possible - getting the tools loaded on my development workstation (who knows, maybe someday the math will work and my local workstation will be retired, and instead live in the cloud, only to be spawned when needed).  After a query to the friendly neighborhood google, I had an official link for Setting Up the Amazon EC2 Command Line Interface Tools.  This set of directions had a link to the latest download distribution (currently 1.6.7.2):


The download is fairly small (14meg), and was unzipped into my tools directory like any other java distribution:


I'll spend some time researching the task of building an appropriate command line environment and establishing proper credentials to the Amazon infrastructure and post again after I know what I should be doing.

Saturday, April 20, 2013

How to modify MAX_ALLOWED_PACKET in MySQL

While working with BLOB/CLOB fields in MySQL, it won't take long to encounter the following issue during a DML statement:

Packets larger than max_allowed_packet are not allowed.

Using the following command:

SHOW VARIABLES LIKE ‘max_allowed_packet’;

You can see that the networking parameter MAX_ALLOWED_PACKET defaults to 1048576 (1MB).  Since a 1MB BLOB file is fairly paltry, the parameter must be updated to a more reasonable value.  Logged in as root (or similarly admin'ed user), issue the following command to modify the parameter:

SET GLOBAL max_allowed_packet = 16 * 1024 * 1024;

GLOBAL refers to the sessions which are effected by the call; meaning that all sessions will now honor the new 16MB limit.  However, there is a catch.  At this point, the change is not persistent (see notes that this is not a bug).  A recycle of the service will reset the value back to the original 1MB setting.

To permanently change the value, the my.ini configuration file must be altered;  mileage may vary on the location of said file (install location, OS, etc., etc.), but in my case, the file lives in C:\Users\chris\Development\mysql\my.ini.  Find the mysqld section, and add a line for the setting:

[mysqld]
# ADDED BY CHRIS ON 20 APRIL 2013
max_allowed_packet=16M

Save the file and restart the MySQL service.  The value should now be permanent.

Saturday, March 2, 2013

Quicken 2013 bugs and annoyances

It has been three years since my last Quicken update, and due to the upgrade blackmail that Intuit has in place (stopping support for online transactions after three years), I again found myself in the position of needing to upgrade.  The deluxe version of any given year always seems to provide everything I need in a "home accounting package", and the $30 is not overly burdensome on the home budget; Its really just the principal of the whole forced upgrade that rubs me wrong.  I really should spend the time and migrate to an online solution, but now that Intuit owns Mint.com as well, I'm really not sure its worth the hassle and extra risk of keeping everything online.

Like most purchases these days, I purchased the product through Amazon.com, and this time there was even an option to download the binaries directly from amazon (ie - no DVD to collect dust on my desktop).  The opinions on amazon for this 2013 upgrade have been fairly abysmal; lots of problems, bugs, etc.  Generally speaking the product has not changed significantly this century, so it always surprises me how many bugs they can introduce in any given release; perhaps they need to upgrade the college interns they have working on their baseline.

As luck would have it, I waited until the very end of my Quicken 2010 lifespan before upgrading, which seems to have been prudent again;  the amazon download started me out on release 10 (r10) of Quicken 2013, and within a few days, there has already been an r11.  Again, on a product that has basically been a static release for 20+ years, I'm not sure how they manage to create so many darn bugs.

My upgrade seems to have gone smoother than most (and that I attribute to starting on the 10th revision of their software).  There was one annoyance I encountered: after upgrading, when I performed "One Step Update" to sync my accounts, I saw two accounts in the list have been gone and disabled for years that had magically come back to life.

After a bit of digging, I found the workaround on the Quicken support site:

How to Remove a Bank Name from One Step Update Settings

Walking through these steps successfully removed my old accounts, but I'm still a bit miffed over the fact that the upgrade re-introduced old accounts into my update settings...